Eva Blessing Onyeulo
Design Engineer
Collaboration:
A Singer & A Robot Arm

What is my Project?
This project is a collabration between human and robot, between vision and hearing. The aim is to break the boundaries between the machine and the humans, showing unity and togetherness in order to obtain one goal; a beautiful painting. This is a performance between a brave member of the audience who decides to step up to the mic and sing a song to the robot. As the person sings, the robot paints a painting in the style of Jackson Pollock, depending on the notes that the person sings and the volume of the different parts of the song. The robot used in this project is an ABB Industrial Robot Arm, usually used to things such as paint cars, lift heavy objects or be involved in some "pick and place" task.
Some examples of Jackson Pollock's paintings:
ABB Industrial Robot Arm


This installation has been created to bring about a performance where both the human and the robot are working together in partnership, taking the strengths of the robot and merging it with the creativity of a human, with a painting as a result of this interaction. It is also a social experiment to see how people feel when interacting with a robot, whether they feel as if they are working as part of a team. I am also investigating whether participants are willing to explore and interact with the installation, and if they are, how they choose to interact with the installation once they notice that they can be in control of the robot.
Paint my voice: artistic human-machine collaboration, breaking boundaries & creating masterpieces.
 |  |
|---|---|
 |  |
 |  |
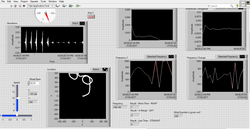 |  |
LabVIEW Programming
I used LabVIEW to create a program that analyses the sound of the human performer, it takes the frequency and the amplitude of the sound wave and uses it to calculate x and y coordinates to send to the ABB robot arm. Above are some pictures and videos of some of the tests made and the simulation of sound being used the position the robot arm.
How does it work?
1. Singer steps up to the mic and starts to sing
2. The sound analysing program in LabVIEW (a programming software) picks up the singing and takes the amplitude (volume) and Frequency (pitch) and calculates x and y coordinates for the robot arm to move to
3. The paint drips on to the page as the robot arm moves to the designated position
There are some rules that the program follows to calculate the positions. Below are the rules.
Rules of Movement:
1. As soon as the installation is started, the robot has a speed of 5mps. As the volume increases the speed increases to
10mps then 20mps. As the volume changes, the colour selection changes, sometimes just 2 colours will be released,
sometimes all 3 colours are released.
2. If the singer reaches a high frequency, the robot steers to the right, a low frequency steers the robot to the left and a mid
range frequency keeps the robot moving in a straight line.
 |  |
|---|---|
 |  |
 |  |
 |  |
 |  |
 |  |
 |
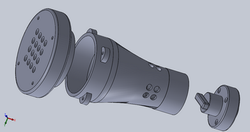
Designing the End Effector - Phase 1
I came up with some designs for the End Effector (the part that is attached to the robot arm, which the paint comes out and on to the page). For easy assembly and maintenance, I designed the end effector in 3 parts; a cap, the main body and a base plug. I designed an exchangeable cap so that I am able to test different cap designs easily, but also to be able to make sure that the tubes are in the right place. The separate base plug attaches the main body of the end effector to the robot arm.

Testing the Pumps
A Peristaltic Pump is used to move the paint to the end effector. This pump constantly pumps the same amount of fluid so the amount pumped can be easily measured, and so is often used in the medical field. It also doesn't allow fluid to be released out of the pump unless the pump is on which means that a valve is not needed to control the flow of the paint, saving space on the overall system.
These pumps are turned on and off using a H-Bridge, connected to a myRIO, which is controlled by the LabVIEW program. The volume of the sound wave is analysed and depending on the volume, the different pumps would turn on and off.
Low volume = Speed of 5 = Blue & Yellow pumps are turned ON
Medium Volume = Speed of 10 = Red & Yellow pumps are turned ON
High volume = Speed of 20 = All three pumps are turned ON
 |  |
|---|---|
 |  |
 |  |
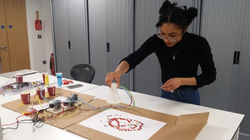
Testing
I spent some time testing the peristaltic pumps with the end effector prototype to see the amount of flow that one pump allows, which helped me to decide that I only need one pump for each of the 3 colour used. This is because the tubes and pumps being used release quite a large amount of fluid that fill up the A3 page quite quickly. Above you can see some paintings that were made during the test. I tested acrylic paint with different viscosity, from thick acrylic paint to very watery paint.
 |  |
|---|---|
 |  |
 |  |
 |  |
 |
End Effector - Phase 2
After this experiment I made some changes to the end effector, making the body of the end effector smaller, and I made a nozzle cap and a flat cap. The nozzle cap is for the very watery paint and the flat cap is for the thick pant.., this allows flexibility as to what type of paint can be used. This can be seen below.
 |  |
|---|
Connecting to the ABB robot Arm
To connect to the ABB robot arm, H-Bridges were used to send 24V digital signals to the robot controller from the myRIO. The LabVIEW program sends digital signals to the robot controller which tells the robot to go left, right, backwards or forwards. There is also another program that when the robot controller receives these digital signals, depending on the combination of signals, the robot moves to various pre-programmed positions.
Below is a video I took of the simulation of the robot arm in RobotStudio of the program with the pre-programmed positions